Wednesday, December 28, 2011

Set For Puppet Video


Ok this is not my work. 
This is from swazzle.com but I thought it is so awesomely cool I just had to share it.


Plastic water jugs, muffin pans, plastic to-go trays, gatorade bottles, various electronic parts all painted to look grimy. 


I thought the streaks on the windshield was a nice touch.


Then add some lighting.


A few more various pipes and wires, then straw.


More cool lighting effects!

Built high enough the puppeteers can stand up straight.


Thursday, December 22, 2011

How to make a prop fireplace

We needed a prop fireplace for our Christmas program that our church was doing.  So back to styrofoam.

I built a frame out of 2x4s so the outside dimensions were 3 1/2 feet tall by 4 foot wide and 2 foot deep.
Then I cut 1/2 inch styrofoam for the front and two sides.  The back I left open since no one would see it.


My sister Jill went to work painting the inside of the fireplace.   For this we just used a cardboard box that was cut to have the same dimensions on either side.  Then a coat of flat black.
We could have used one of those science fair project boards too but we didn't.


This is the finished inside.


I had to check how it looked.  


Here Jill is "mending" some rough spots in the 2 inch thick styro. She is doing this with 2 inch wide masking tape.  The tape covers up holes and takes paint really well.  This is best done if you are going to view it from a distance.  I wouldn't recommend it if your audience is going to be up close.

 This is a recycled piece that has been numerous different things. This piece will be the mantle.
 I cut this so it would stick over the front about 6 inches.


I forgot to take pictures so I will try and explain.  I attached the styro to the sides and front. Gave it a coat of light grey paint.  Then we had some styro stones (if you want to see how to make stones then follow this right here and scroll down near the bottom) left over from another set, so I glued them to the front and sides.  I will tell you I had to fight against my O. C. D. (I like to call it C. D. O. that way they are all in alphabetical order.) and not put them in a line.


Here is a top view of the fireplace. 


We painted the mantle with the same grey paint as the background pieces, but I didnt like the way it looked so we darkened it up a bit with some darker grey.  You might also notice that there are a few stones missing, (if you look at the earlier pics you will see that they were too light and noticeable) we painted them the darker grey also.   Also the middle of the stones seem to have a lighter spot in them.  This is because I was trying to hide the screw heads.  We had to go back and repaint them again too.

We added some real wood, a fake fire, a fireplace screen and we had a fire place perfect for our performance.

I didn't get a good picture of the fireplace after it was all finished.  So just use your imagination.

Tuesday, December 13, 2011

How to make a rod puppet no visible strings

Ok so I have wanted to make a rod puppet for some time now.  I wanted to try and make a mech that didn't have any visible strings.  

So I started with about a 18 inch long piece of 1/2 inch pvc pipe.
This will be the inside piece, and it will be the neck and hold the head.


Also about a 8 inch piece of a coat hanger.  It tried to get it as straight as I could get it.

About two or three inches down I drilled a 3/32 hole all the way through.  


Then I bent the coat hanger into this shape. This is going to be the bottom jaw. The loop will be used for the spring, and for the string that opens and closes it.

I spread the sides of the coathanger apart and put them in the hole I just drilled.


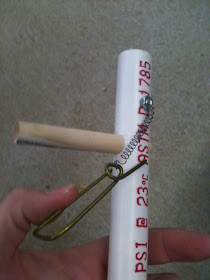
Then i drilled a 7/16 inch hole all the way through just above where the wires went in.

Then I put a dowel rod in the hole.  This is going to be the top jaw.


I took a spring out of a click pen that didnt write anymore. I hooked that to the loop in the coat hanger and stretched the spring to see where it needed to go.  I drilled another hole for a small bolt and attached the spring to it.


Now when I pull down on the mouth it...


springs back closed


I drilled another small hole underneath the bottom jaw.  This is where the string will go through.


Near the bottom I drilled another small hole. This is where the  string will exit.  I also took another piece of coat hanger and made a trigger.  The same way I made the bottom jaw, except no loop.  Looking back I probably should have made a loop in this one too. I ended up taking this trigger off and putting it on the next piece. 


This starts the beginning of the outside piece.
The outside piece will have the puppet's body attached to it.

Then I took a 1 inch pvc pipe cap and drilled a hole big enough for a 1/2 inch pvc to go through it.  I want to say it was 7/16 but I am not sure. This is going to attach to the top of the outside pipe. The hole in the cap keeps the inside pipe centered. The hole is also slightly bigger than the smaller pipe which will allow it to turn.


I took a longer piece of 1 inch pvc. This is going to be the outside of the mech.
 I measured where the trigger should be. Then behind that and a little higher I cut a slit.

I cut a half a piece of pvc and sanded the edges. I put a bolt through it and epoxied them together.


This is the handle and the trigger.

On the front of the outside piece I cut out a half section about an inch long.This is where the string will come through.  You can see I have already threaded the string through.  My kids invaded the shop about this time so I was more focused on keeping them safe than I was on taking pictures.
I used a piece of picture hanging wire originally but it was too stiff, so I then I used a piece of string.


As you can see I attached the thumb control to the 1/2 inch pvc. This allows the head to turn side to side while still opening and closing the mouth.
This also keeps the inside pipe from sliding out of position.


Testing...

It works!!!
The next time I think I will make a more comfortable grip.  That is my only complaint.

Tuesday, November 8, 2011

Operation: Snake Puppet Finished

I took some plastic spoons and sanded the handle off, and then lightly spraypainted flat white on them.
Over all he is about 5 1/2 feet long.


All done!


This snake head pattern is available for $5.99 on Etsy
Snake Head Puppet Pattern Click Here